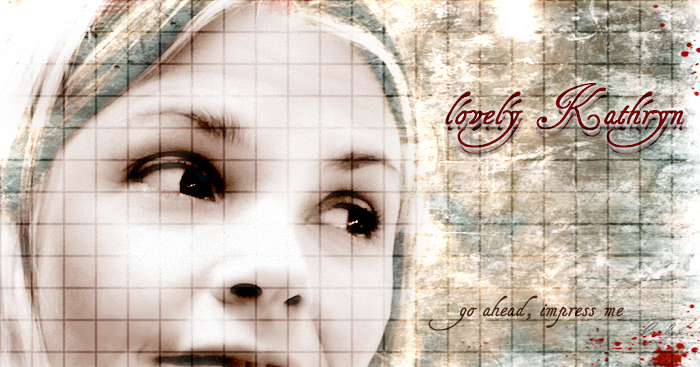

…to this:

This is my first tutorial. I hope you get what I want to show you. I use Photoshop CS3.
I thank cath from caths_arts for her translation list. I have to use it every time when working with tutorials.
I found this amazing Stir of Echoes Cap a couple of days before. It showed Kathryn Erbe as Maggie Witzky.
01. Open the picture with photoshop.
02. The picture is 800 x 534. Because Maggie’s face/hair line looked a little grainy, I resized to 600 x 401.
03. I also didn’t like the grainy green/yellow background. I took the blur tool in a big size and ran over all the places which bothered me.

04. To lighten the whole picture a little bit: new layer --> New Adjustment Layer --> Brightness/Contrast: Brightness +20
05. Maggie’s mouth caught me from the first moment. To highlight that area even more, I added a new layer and set it to soft light. Took a soft brush (size 12) and a dark red (6d000a). Over-draw the mouth area. Because even on soft light the red was too much, I took the eraser tool, opacity 50% and in the size (60) of the whole mouth. Push it ONE time on the layer.

06. I took these three textures Wallflower 2, Wallflower 4 and Grungy Flowers 4 of aethereality.net for the background. Move them where you like them. I think I resized one of the three, too. Set all three textures to Color Burn 100%.
07. Took the eraser tool and remove the structures over Maggie’s face and hair.
08. To make the little flower in the right corner a little bit more interesting, click again on the mouth layer, took a small brush, the same red or another and set another color focus.

09. I took this grunge flower texture of tiger_tyger and place it in the left down corner and set it to soft light. I erased the most of texture, blurred the edges and only let the flower complete my banner.

10. Took this icon texture of tiger_tyger and blow it to 600 x 401 before you set it with soft light on top of your layers.
11. Use the eraser tool in a big size and remove the last texture over Maggie’s face and whole body.

12. To sharpen Maggie’s face a little, I used the lasso tool, encircled the region and sharpened it (filter --> Sharpen --> Unsharp Mask: 50%; 1,0; 0 ).
13. Last step: the text. The font is called, Bickham Script Pro. I moved the font layer under the texture layers and added Layer Stile --> inner glow --> fee0b0 opacity 75%.
Good Luck and I would love to see your results. Please give credit when using.
I thank cath from caths_arts for her translation list. I have to use it every time when working with tutorials.
I found this amazing Stir of Echoes Cap a couple of days before. It showed Kathryn Erbe as Maggie Witzky.
01. Open the picture with photoshop.
02. The picture is 800 x 534. Because Maggie’s face/hair line looked a little grainy, I resized to 600 x 401.
03. I also didn’t like the grainy green/yellow background. I took the blur tool in a big size and ran over all the places which bothered me.
04. To lighten the whole picture a little bit: new layer --> New Adjustment Layer --> Brightness/Contrast: Brightness +20
05. Maggie’s mouth caught me from the first moment. To highlight that area even more, I added a new layer and set it to soft light. Took a soft brush (size 12) and a dark red (6d000a). Over-draw the mouth area. Because even on soft light the red was too much, I took the eraser tool, opacity 50% and in the size (60) of the whole mouth. Push it ONE time on the layer.
06. I took these three textures Wallflower 2, Wallflower 4 and Grungy Flowers 4 of aethereality.net for the background. Move them where you like them. I think I resized one of the three, too. Set all three textures to Color Burn 100%.
07. Took the eraser tool and remove the structures over Maggie’s face and hair.
08. To make the little flower in the right corner a little bit more interesting, click again on the mouth layer, took a small brush, the same red or another and set another color focus.
09.
I took this grunge flower texture of tiger_tyger and place it in the left down corner and set it to soft light. I erased the most of texture, blurred the edges and only let the flower complete my banner.10.
Took this icon texture of tiger_tyger and blow it to 600 x 401 before you set it with soft light on top of your layers.11. Use the eraser tool in a big size and remove the last texture over Maggie’s face and whole body.
12. To sharpen Maggie’s face a little, I used the lasso tool, encircled the region and sharpened it (filter --> Sharpen --> Unsharp Mask: 50%; 1,0; 0 ).
13. Last step: the text. The font is called, Bickham Script Pro. I moved the font layer under the texture layers and added Layer Stile --> inner glow --> fee0b0 opacity 75%.
Good Luck and I would love to see your results. Please give credit when using.


Wow, I am in awe. I bow to your excellence.
ReplyDeleteThe Photoshop program you use, is it the latest version? Is Photoshop something that you would say is easy to use? and would you recommend that I buy it? I'm sure you are familiar with Angie's Wallpaper's? Will I be able to create artwork like that with Photoshop? Your tutorial has really piqued my interest.
Hey Bev, wow so many questions and thank you to your compliment. I wanted to make a banner with the Vincent picture of the Australian newspaper (the close up, not the beach pictures) but had no inspiration. But finding Maggie Saturday gave me a kick.
ReplyDeleteNo, I think the latest PS version is Photoshop CS.7 or nine...I don't know.
If you don't have someone who still is working with PS and can explain steps, it's very complicated to start with. I struggled over a long time to change to PS, but tjara kicked my ass a lot of times and I started last Spring with a downsized version which was installed on my computer. I thank her so much that she changed my mind. I was very afraid of all the buttons of PS. But I knew that tjara would answer every stupid question I had and have.
And as she visited me, she installed the CS3...pssst, I have no lic...
PS is a very expensive program (because it's a pro tool to work with photos and art). 200 € for a students version and even more (700 €) for the normal version. The Elements [this was the one I had on my computer] version is not that expensive...50-100 € but there you don't have all possibilities of the program.
But I think you can have a test version for 30 days for free...when you want to test it.
And yes, I think Angie is doing her art with photoshop or another good picture program.
A suggestion. Google for GIMP. It should be very good, FOR FREE and you can do the same things like PS. I don't have any own experiences with gimp but I hear only good about it.
WOW! Wonderful havers. Your tutorial is clear and the result is perfect!
ReplyDeleteSehr Schön !
ReplyDeleteSehr Sexy !
Liebe A . Du bist ja richtig gut !!
;-)
@potzina: thank you. I'm waiting for someone who is trying the tuto. Quietfire started but had no time to finish.
ReplyDelete@rennschnecke: Richtig gut? Danke! Dafür, dass ich erst ein 3/4 Jahr mit PS spiele ist es ganz ordentlich. Aber es ist ein Programm bei dem man nie auslernt.
Sexy...OMG, auf jeden Fall.